
What Happens on the Day of Your Driving Test?
Arriving at the Test Centre
On the day your driving test is scheduled, your journey begins at the test centre. It is important to arrive at least 15 minutes early to give yourself time to relax and go over any last-minute reminders. Bring your provisional licence, theory test pass certificate, and, if you’re using your own vehicle, all the necessary paperwork such as insurance and MOT certificates. These documents are essential for the examiner to check before your test can start. Waiting areas at most centres are well signposted, so you’ll know where to sit until your examiner calls you.
The Briefing and Document Checks
Once called, you’ll meet your driving examiner. The examiner will ask to see your documents and confirm your identity. You’ll be asked to sign a digital or paper form to confirm you have lived in the UK for the required period. At this point, the examiner will explain the structure of the test and invite you to walk out to your car together. If the weather is poor, you may be advised to wait inside for a few minutes longer.
The Eyesight Check and ‘Show Me, Tell Me’ Questions
The first checked skill is your eyesight. You need to read a number plate from a distance of 20 metres for vehicles registered after 1 September 2001 or 20.5 metres for older vehicles. If you wear glasses or contact lenses, make sure you have them on. Failing the eyesight check means your test cannot continue. Next, you will be asked one ‘tell me’ question before the drive. These relate to vehicle safety – for example, explaining how to check that the brakes are working. Later, while driving, the examiner will ask a ‘show me’ question, which involves physically demonstrating a car control while on the move, such as operating the rear windscreen wiper.
The Practical Driving Portion
This is the main part of your test and takes roughly 40 minutes. During this time, you’ll drive on different types of roads, covering a mix of urban, residential, and sometimes rural or dual carriageway routes. Your examiner will give you clear directions ahead of time. Key elements of this section include:
- Normal driving: Following the road ahead, responding to signs and hazards, and managing speed wisely.
- Manoeuvres: Performing one of a range of car manoeuvres, such as parallel parking, pulling up on the right and reversing, or bay parking.
- Independent driving: For about 20 minutes, you’ll either follow sat nav directions or a series of traffic signs, testing your ability to drive without turn-by-turn instructor input.
- Emergency stop (in one in three tests): Demonstrating safe and controlled breaking when asked.
If you want to review official requirements, visit the official UK Government website for detailed guidance on each step of the process.
What Examiners Are Looking For
Throughout your test, the examiner observes your ability to remain calm, follow the rules of the road, and react properly to other drivers and potential hazards. Minor faults, often called driving faults, are allowed (up to 15), but a single dangerous or serious fault will result in a fail. Critical qualities like mirror checks, correct signalling, appropriate speed, and safe gap judgement feature heavily in the examiner’s checklist.
Common Reasons for Failing
| Fault Category | Example Mistake |
|---|---|
| Observation | Not checking mirrors before changing direction |
| Junctions | Failing to give way or conducting poor observation |
| Steering | Losing control or mounting the pavement |
| Response to signs | Ignoring traffic lights or speed limit signs |
For additional tips on avoiding these common pitfalls, check out resources like RAC’s driving test tips.
What Happens After the Test
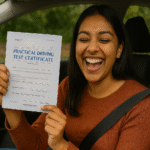
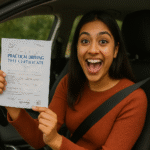
Once you return to the test centre, the examiner will tell you the result straight away. If you pass, you’ll get your pass certificate and instructions on how to apply for your full licence. If you didn’t pass, they will provide you with feedback on where you went wrong and advice on areas for improvement. Either way, take a moment to decompress – the test is an intense experience, and you’ve earned a breather.
Final Tips for a Smooth Test Day
- Sleep well the night before to help you focus and manage nerves.
- Eat a light meal so hunger doesn’t distract you.
- Bring all your documents – missing paperwork can result in test cancellation with no refund.
- Double-check your car meets all requirements, especially if you’re not using a driving school vehicle.
- If you’re anxious, try relaxation techniques or breathing exercises to remain calm before and during the test.
Your test day is just one step in your driving journey, but understanding what to expect helps put you in control. Trust your practice, keep your cool, and drive as you have trained – that’s the best way to succeed.
Arriving at the Test Center: What to Expect
Stepping Into the Driving Test Center
The morning of your driving test will likely be a mix of nerves and excitement. As you pull up to the test center, it’s normal to feel a rush of anticipation. Most test centers have designated parking areas for test candidates, so make sure you arrive with enough time to find a spot and settle your nerves.
Upon entering the center, you’ll usually find a waiting area reserved for learner drivers and their support people. Front desks or check-in counters are clearly marked, where friendly staff will greet you and ask for your provisional license and, if required, your appointment confirmation. Double-check that you have all your legal documents in hand before you walk in, as missing paperwork can delay or cancel your test. A quick review of official driving test requirements can give you peace of mind before you go.
What You Need to Bring
- Provisional driving license
- Appointment confirmation letter or email
- Glasses or contacts if you need them to drive
- Car insurance and MOT certificate if using your own car
Double-check the list of required items from authorized sites to make certain you don’t forget anything, as some centers are strict about documentation.
Getting Ready Before Your Examiner Arrives
You may have to wait a short while until your examiner calls your name. Use this time to go over your handbrake, mirrors, and controls if you’ve brought your own car. If you’re using an instructor’s vehicle, check your seating position and controls for comfort. Try some simple breathing exercises to help calm any nervousness.
The Waiting Area Experience
Don’t be surprised if the atmosphere feels both tense and hopeful; everyone around you is in the same boat, preparing quietly for their turn. Some centers allow family, friends, or instructors to wait with you. Rules regarding waiting areas may vary, especially if there are recent health guidelines, so check your test center guidance online or call ahead if you’re unsure.
Meet Your Examiner
When it’s your turn, the examiner will introduce themselves and check your identification and paperwork. They’ll ask you to sign a form confirming that your car is insured for the test and that you meet all legal requirements. This could be a paper form or a tablet.
Health and Safety Reminders
- It’s important your vehicle is roadworthy: lights, indicators, tires, and wipers must all be in good condition.
- Face masks or sanitizers may still be required at some centers. Check current guidance on official UK driving test site before your appointment.
- Arrive 10 to 15 minutes before your scheduled time—arriving too early can cause congestion in the waiting area, while late arrivals may result in cancellation.
Typical Schedule at the Test Center
| Step | Time | Notes |
|---|---|---|
| Arrival and Parking | 15-20 min before test | Allows for paperwork and settling nerves |
| Check-in & Paperwork | 10-15 min before test | Don’t forget your provisional license! |
| Meeting Examiner | At start time | Identity and vehicle checks |
| Eyesight Test | Immediately after check-in | Reading a number plate from a set distance |
Final Thoughts Before You Start
Remember, the staff and examiners at the driving test center are there to help you and ensure the process is fair for everyone. Take comfort in a calm environment, stay focused on your preparation, and trust that your training has brought you this far. For more detailed tips and resources, visit the RAC’s practical test advice dedicated to driving test day guidance.
Key Documents and Items You Must Bring
Essential Papers for Your Exam Day
On the morning of your driving test, your nerves might be racing with excitement and anticipation. But before you even step out the door, it’s crucial to double-check that you have all the right documents and items required by your local driving test center. Forgetting even one key item can result in your test being canceled and fees being lost. Let’s walk through exactly what you’ll need to have ready so you can focus on passing, not paperwork.
Your Learner’s Permit or Provisional License
The examiner cannot proceed without seeing your valid provisional license or learner’s permit. This card is your official proof that you are legally allowed to take the test. Double-check that the document is current—expired or damaged cards will not be accepted.
- If you’ve updated your address or other details recently, carry any extra paperwork to show the change.
- Some regions allow digital versions, but bring a printed hard copy to avoid issues.
Proof of Road Test Appointment
Many testing centers require you to show confirmation of your scheduled appointment. This proof can be a printed confirmation page or, in some areas, a digital version on your phone. You can usually download this from the official DMV website or the agency with which you booked your road test. Government portals often provide an email or a printable slip as confirmation. Arriving without this could delay your test or, in some cases, prevent you from taking it that day.
Identification Documents
Besides your permit, an official government-issued photo ID may be needed, especially if you are over 18 or your permit does not have a photo. This could be your passport, a state ID card, or an out-of-country license (if accepted). Check the exact requirements on your local test center’s website. Some regions require multiple forms of ID, so always verify in advance.
| Document Type | Examples |
|---|---|
| Photo ID | Passport, State ID, Previous License |
| Appointment Proof | Email Confirmation, Printed Slip |
| Residency Proof (if required) | Utility Bill, Bank Statement |
Other Crucial Items for Your Vehicle
If you’re using your own car for the driving test, you need to provide extra documentation relating to the vehicle. This ensures your car is legally allowed to be on the road, and that it’s ready for inspection by the examiner.
- Registration Papers: Bring the current registration certificate for the vehicle.
- Proof of Insurance: Most centers require that your car is insured. This can be a valid insurance certificate or digital proof via your provider’s app.
- Roadworthy Test Certificate: In some areas, your car needs a recent MOT or safety inspection certificate to prove it’s safe for road use.
Your test can be canceled on the spot if your vehicle doesn’t meet these requirements, so it’s vital to check your car’s documents and status before test day.
Required Payment
Some locations require an additional fee on the day of your test. While many places accept card payments, some still prefer cash. Check your local DMV agency for accepted payment methods to avoid last-minute issues.
Any Extra Forms or Medical Certificates
If you have medical conditions or restrictions on your provisional license, bring any relevant medical certificates or forms. This is often the case for vision issues, diabetes, or other health matters that may impact your ability to drive safely. The examiner will need to review these before starting the exam.
Checklists Help You Stay Organized
Here’s a practical checklist you can use before heading to your test:
- Learner’s permit or provisional license
- Appointment confirmation
- Photo ID (if needed)
- Vehicle registration
- Insurance proof
- Roadworthiness/MOT certificate (if required)
- Required payment (card or cash)
- Corrective lenses (if needed)
- Medical forms or additional paperwork
Having these documents and items ready removes one more obstacle from your path to becoming a licensed driver. This level of preparation will allow you to focus on what really matters: performing your best during the test itself. Visit your local driving authority’s official website for complete and up-to-date requirements, and never hesitate to call them if you have a question. Taking these extra steps ensures nothing will stand between you and your driver’s license on test day.
Understanding the Pre-Test Vehicle Check
What Is Involved in the Start of Your Driving Test?
If you’re getting ready to complete your practical driving test, there’s a crucial step that comes before you start driving: the vehicle safety check. This is sometimes called the “show me, tell me” section, and it’s your first hands-on interaction of the day with the examiner. It’s perfectly normal to feel a few nerves before stepping inside the test car, but understanding what’s expected from you can help set a confident tone.
Why Vehicle Checks Matter
Your test begins with the examiner asking you a couple of questions about the car’s safety features. These vehicle checks are not only about ticking a box; they show the examiner that you understand how to keep yourself and others safe on the road. Simple questions—such as how you would make sure your tires are legal or how to check the headlights—prove you know the basics of car maintenance, which is a huge part of responsible driving.
What to Expect with “Show Me, Tell Me” Questions
During this pre-test task, you’ll face two questions: one you’ll answer before driving, the second during your drive. The first is usually a “tell me” question. For example, the examiner might ask, “Tell me how you’d check that the brakes are working before a journey.” You’ll need to explain the process out loud.
Later, during the drive, the examiner asks a “show me” question. Here, you’ll demonstrate the requested action—such as showing how to wash the windscreen using the car’s controls. The goal is to show that you can operate the car’s safety features while staying in control. Some common areas you might be tested on include:
- How to check that the tires have sufficient tread depth and no damage
- How to test that the brakes are working
- How to check that the indicators or brake lights are functional
- How to clean the windscreen or adjust the demister controls
Tips for Nailing Vehicle Checks
Getting these initial checks right is easier than you might think—just dedicate a little time before your test and you’ll be good to go. Here’s a quick checklist to keep you on track:
- Learn where the controls are: Pop the hood, sit in the driver’s seat, and get comfy with all the switches and dials before test day.
- Practice explaining each check: Speak the answers out loud as if you’re talking to your examiner or a friend, so everything sounds natural.
- Check your vehicle handbook: If you’re unsure, your car’s manual (often stored in the glovebox) will have diagrams and step-by-step guides to every control.
To explore a full list of potential vehicle safety questions you might face, you can visit the DVSA’s official website.
Getting to Know Your Test Car
If you’re using an instructor’s car for your test, it’s often set up for learners, but it sometimes differs from your home vehicle. Take a few moments to re-familiarize yourself with:
- The position of the bonnet release
- Where to locate the oil and coolant indicators
- Placement of the hazard lights and fog lights
- Windscreen wipers and washers
- All dashboard controls, like rear demisters and horn
Always ask your driving instructor to go through these controls with you, especially if you haven’t used a feature recently during lessons.
Do Mistakes on This Section Really Matter?
Don’t panic if you stumble during this early stage. If you get a question wrong, it’s only counted as a minor driving fault. Most people make one or two small mistakes, but this won’t cause you to fail. It’s only in rare cases—where an error demonstrates a wider lack of safety awareness—that it could seriously affect your test result. Click here for extra guidance and practice questions.
Key Safety Check Areas: Quick Reference Table
| Area to Check | What to Do | When/How |
|---|---|---|
| Tires | Look for cuts, bulges, and check for 1.6mm tread across the central three quarters | Weekly and before long journeys |
| Lights | Turn on lights, walk around the car, check all indicators, brake and tail lights | Before any drive, especially in poor visibility |
| Fluids (oil, coolant, brake fluid) | Open the bonnet, check dipsticks and fluid levels | At least monthly or as warning lights indicate |
| Wipers & Washers | Press washer button, ensure jets and wipers work properly | Before driving in rain or on dirty roads |
Resources for Further Practice
To help you prepare, there are great resources online with sample “show me, tell me” questions and video demonstrations. The official government guide includes up-to-date advice for what to expect and how to answer. Spending time reviewing these can boost your confidence for test day.
Most importantly, remember that the vehicle checks at the start of your test are your opportunity to show readiness and build first impressions. Take your time, and trust your learning. By being familiar with these checks, you set yourself up for a smoother, more confident driving test experience.
Navigating the On-Road Driving Assessment
Understanding What the Test Examiner Looks For
On the big day, you’ll sit behind the wheel, ready for your on-road assessment. The examiner in the passenger seat isn’t there to trick you, but they will pay close attention to your driving skills and behavior. Their job is to make sure you’re safe, aware, and able to follow the rules of the road. You’ll be judged on several key abilities:
- Control of the vehicle: Smooth steering, proper braking, and correct use of pedals matter greatly.
- Observational skills: Regular mirror checks, scanning at junctions, and awareness of your surroundings are vital.
- Following instructions: Listening carefully and applying what the examiner asks without hesitation is crucial.
- Use of signals: Timely and correct indication tells others what you intend to do.
- Dealing with hazards: You must spot and handle situations like cyclists, pedestrians, and tricky intersections safely.
Everything you’ve practiced comes into play. Examiners look for consistent, calm, and controlled actions rather than perfection on every maneuver.
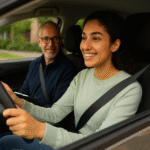
What Happens When You Get Into the Car
Once you’re inside the vehicle, the examiner will confirm your identity and might run through a safety check. They can ask you to demonstrate basic controls, like turning on the headlights or activating the windshield wipers. Don’t worry if you feel nervous—this is normal. Take a few deep breaths and use this moment to adjust your seat, mirrors, and anything else that will make you comfortable.
The test route may start from the test center or another appointed location. Examiners use various routes to see how you handle different road types and traffic conditions. Many learners find comfort in reviewing local routes ahead of time, though surprise elements can still pop up. For tips and a selection of popular practice routes, the Driving Test Success website is a valuable resource.
Common Tasks During the Assessment
You will be expected to perform a range of everyday driving tasks. The table below outlines common maneuvers and skills you may be asked to demonstrate:
| Task | What’s Assessed | Tips |
|---|---|---|
| Parallel Parking | Accuracy, observation, and safe spacing | Take it slow, keep checking mirrors, and don’t worry if you need a correction |
| Three-Point Turn | Use of mirrors, control, and traffic awareness | Pause and check both ways throughout |
| Emergency Stop | Reaction speed and control under pressure | Listen for the examiner’s instruction, react firmly and safely |
| General Driving | Road position, speed, and judgment | Follow all traffic signs, keep calm, and stick to speed limits |
| Hill Start | Control and use of handbrake/clutch | Focus on a smooth start without rolling back |
You may also encounter other situations like roundabouts, busy city roads, or country lanes, depending on the test location.
How to React to Mistakes During the Drive
Even the best learners can make errors. What’s important is how you handle them. If you realize you’ve made a mistake—such as missing a signal or slight hesitation—keep your cool and focus on driving safely from that point onwards. Examiners are watching to see your recovery and composure, not just the slip-up itself. Serious or dangerous faults could result in a fail, but minor mistakes may not. The key is not to let one mistake affect the rest of your drive.
For extra advice on managing nerves and staying focused, you can look at resources like Safe Driving for Life.
The End of the Assessment
At the end, you’ll return to the test center and the examiner will review your performance. They’ll explain where you did well and highlight any areas needing improvement. If you pass, you’ll get a certificate and details on how to upgrade your learner’s license. If you don’t pass, you’ll receive feedback to help you next time.
Remember, this assessment isn’t about trick questions or hidden challenges. It’s about proving you can navigate real-world roads with safety and confidence. Every successful driver began right where you are now, facing that first on-road assessment.
Common Mistakes and How to Avoid Them
The Most Frequent Errors Learners Make on Test Day
On the day of your driving test, your nerves can get the best of you—even if you know the rules inside out. Some errors are more common than others and can easily result in missed points, or even an automatic fail. By understanding these, you can prepare yourself to steer clear of them and boost your chances of success. It’s all about awareness, practice, and a calm mindset.
Overlooking Basic Checks Before Moving Off
Many candidates forget essential safety checks before setting off. Not checking mirrors and blind spots, or failing to fasten your seat belt, can count as critical errors. The examiner is watching from the moment you get in the car—make it a habit to:
- Adjust your seat and mirrors
- Fasten your seat belt and remind your examiner to do the same, if needed
- Perform a full observation around the car, including checking blind spots
These steps show you’re safety-conscious and confident with vehicle controls from the outset.
Poor Use of Mirrors and Signals
The proper use of mirrors and signals is critically assessed during your test. Failing to check your mirrors before signaling, changing lanes, or making turns is a common pitfall. Examiners want to see the “mirrors, signal, maneuver” routine—every time. Make it deliberate and obvious: turn your head, so the examiner can see your checks.
Speed Control and Management
| Situation | Common Speed Error | Tip to Avoid |
|---|---|---|
| Residential areas | Driving too fast for conditions | Always look for posted speed limits and adapt to hazards |
| Approaching junctions | Slowing down too late or too early | Plan to begin slowing sooner for more control |
| Open roads | Driving too slowly, causing traffic build-up | Keep up with flow, but always within the limit |
Maintaining an appropriate speed is key. Don’t focus only on the speedometer—read the road ahead, adjust for weather or traffic, and drive confidently.
Stalling and Panic During Hill Starts
Stalling can knock your confidence, especially during hill starts or in heavy traffic. It’s usually caused by not finding the bite point or not giving enough gas when letting off the clutch. Practice smooth clutch control and, if you do stall, stay calm—restart the vehicle safely and move off when ready. Examiners know mistakes happen; it’s how you recover that counts.
Inadequate Observation at Junctions and Roundabouts
Falling short on observation is a classic error. Many learners forget to look both ways at junctions or make only a quick glance at roundabouts. Always:
- Approach slowly, giving yourself time to assess traffic
- Look both ways—twice if needed—to spot cyclists, motorbikes, and pedestrians
- Proceed only when you’re sure it’s safe
For detailed tips, check this RAC driving advice on real-life junction approaches.
Failing to Respond Properly to Road Signs and Markings
Missing road signs or ignoring markings—such as stop lines or no-entry warnings—can lead to an automatic fail. Train yourself to scan ahead frequently for any new signs, and stay alert for changes in road layout. Early preparation is vital; if you realize too late that you’re in the wrong lane, signal and change lanes only when safe, or follow your current lane with caution while explaining to your examiner, if necessary.
Unsteady Vehicle Control During Manoeuvres
Parking, reversing, and three-point turns all require coordination. Rushing or over-correcting during these can cause you to lose control or mount a curb. Slow down, take your time, and use reference points you’ve practiced during lessons. Examiners are not looking for perfection—they want safe, consistent control. If unsure about an instruction, don’t hesitate to ask for clarification.
Nerves Getting the Best of You
Test anxiety can lead to mistakes you wouldn’t usually make. Before the test, try deep breathing exercises, visualize a successful drive, and focus on one step at a time instead of worrying about the result. Remember, the examiner wants you to pass and is rooting for your success.
Want more driving test tips and real examples of what to expect? Browse resources at DriverActive for interactive practice and up-to-date advice.
Receiving Your Results and Next Steps
Understanding How Results Are Delivered After Your Driving Test
On the day of your driving test, you’ll likely feel a mix of excitement and nerves. Once you complete your test drive, the waiting begins — but the outcome arrives sooner than you might think. In most testing centers, your examiner will provide your result shortly after you finish the route and park back at the test center. This quick feedback is designed to give you clarity, whether you’ve passed or not.
In the United Kingdom, for example, your examiner will invite you to a private area inside the test center. There, you’ll receive either a pass or fail, and you’ll also discuss the details of your performance. If you are in the United States, your examiner may tell you the result directly inside the vehicle or as you step out. Different countries may have slight variations in their process, but the outcome and next steps remain similar globally.
What to Expect When the Results Are Shared
When the results are announced, the examiner will likely do the following:
- Explain whether you passed or failed your driving test.
- Hand you a test report showing the faults you made, both minor and major, to help you understand your strengths and areas for improvement.
- Clarify what each fault means, often offering helpful advice for safer driving in the future.
Being prepared for either result can ease nerves. Remember, even seasoned drivers needed more than one attempt in many cases. A calm attitude is helpful both for the feedback and for your own growth as a driver.
If You Pass: Your Testing Center’s Process
Congratulations! If you’re told you passed, a few important things happen next:
- In some countries, you’ll get a pass certificate right away. This document is your temporary license until the actual plastic license arrives in the mail.
- The examiner may offer to have your full license sent automatically to your home address if you provided this when registering, especially in places like the UK. Remember, you can start driving unaccompanied immediately in many regions if you have your certificate.
- Take care of that certificate – losing it can cause delays while waiting for your full license.
Depending on your locale, you may also need to pay a separate fee for your official license. To understand processes in your area or to check government updates, visit your official local authority, like the UK Government Driving Test page or your state’s department of motor vehicles.
If You Did Not Pass: Understanding Next Steps
Receiving a fail result can feel discouraging, but it is a common experience. Here’s what you need to know if you didn’t pass this time:
- Your examiner will give you a detailed breakdown of the mistakes that led to the result. This feedback is extremely valuable for preparation before you try again.
- You’ll be told how long you need to wait before booking a new test. For instance, in the UK, you must wait at least 10 working days.
- You can book your next attempt online for most places. Check with your local DMV or licensing authority for the specific booking site—like the California DMV’s driver’s license page.
- Use the written report from your examiner to practice the problem areas. Consider a few extra lessons or supervised practice on those specific skills.
Useful Resources at a Glance
| Authority | Type of Resource | Website Link |
|---|---|---|
| UK Government | Official driving test procedures and booking | gov.uk/driving-test |
| California DMV | Test info, licensing, retest booking | dmv.ca.gov/driver-licenses |
| AAA Foundation | Safe driving tips and learning resources | aaafoundation.org |
Key Takeaways for Moving Forward
Whichever result you receive, focus on what you learned and how you performed under test conditions. Passing brings freedom and new responsibilities. Failing is simply a chance to improve and get closer to your goal. After you leave the test center, review your examiner’s comments and plan your next steps—whether that’s sending off for your full license or scheduling more practice sessions. Each experience brings you closer to being a safer and more confident driver.
Key Takeaway:
Key Takeaway: Successfully Navigating Your Driving Test Day
The day of your driving test can feel overwhelming, but understanding what happens at each stage can calm your nerves and boost your chances of passing. Arriving at the test center on time is essential—give yourself a buffer so you are not rushed, as feeling pressed for time can increase stress before you even get started. Once you’re there, expect a waiting area where other candidates may be preparing too. This atmosphere can be tense, but remember that everyone is in the same situation.
Bringing all necessary documents is a must. Typical requirements include your provisional license, theory test pass certificate, and confirmation of your appointment. If you forget any key item, your test could be canceled, causing delays and extra costs. Prepare a checklist in advance, and double-check it the night before your test day for peace of mind.
Before you even start driving, the examiner will conduct a pre-test vehicle check. This is your chance to show basic knowledge about your car, such as how to check the oil or demonstrate the horn. Familiarize yourself with these checks ahead of time to avoid being caught off guard.
During the on-road driving assessment, listen carefully to the examiner’s instructions and stay calm. The route will include a mix of roads and maneuvers—like parallel parking or emergency stops—to assess your control and decision-making. Don’t focus on perfection; instead, aim for safe, confident driving. Many people stumble on common mistakes, such as not checking mirrors or driving too slowly. Practice these skills and ask for feedback from your instructor before test day.
At the end, you’ll receive feedback right away. Whether you pass or need to try again, listen to the examiner’s comments. Each test is a learning experience and offers valuable insight for your journey as a safe driver. By knowing what to expect and paying attention to the details, you set yourself up for driving test day success.
Conclusion
Preparing for the day of your driving test doesn’t need to be stressful or confusing. When you know what to expect at each step—from arriving calmly at the test center and presenting the right documents, to handling the pre-test vehicle check and confidently navigating the on-road assessment—things feel much more manageable. Remember, the examiner is there to see that you follow the rules of the road and show safe driving habits, not to trick you.
Familiarize yourself with the common mistakes, such as not checking your mirrors or misjudging gaps in traffic, so you can avoid them when it counts. These small, preventable errors add up but are entirely manageable if you keep your cool and focus on what you’ve practiced. Stay organized, arrive early, and double-check that you have all required items with you. Making a checklist before heading out can ease a lot of worries.
When your test is over, you’ll receive feedback or your result right away. Whether you pass or need more practice, use the experience as a learning opportunity. If you pass, celebrate this big achievement and remember to carry those safe driving habits forward. If you don’t pass, don’t get discouraged—many skilled drivers need more than one attempt. Use the feedback to prepare for your next try.
Understanding what happens on the day of your driving test, from start to finish, takes away much of the mystery. Approach the day prepared and positive, and you’ll give yourself the best chance for success on this important milestone. Safe travels on your driving journey!


Leave a Reply